
Bebb 4-stick Comb-back
With full-size patterns below the paywall.

This is the story of a single grainy photo that launched an eight-year design arc that produced at least 100 new chairs.
The picture was printed in a stapled-together pamphlet issued by Shire Books. And the author of that little tome was Richard Bebb.
Bebb is an antiques dealer and furniture historian with a shop in Kidwelly, Wales. He’s also the author of several books on Welsh furniture, including the mammoth “Welsh Furniture 1250-1950: A Cultural History of Craftsmanship and Design” (Saer Books, 2007). In 1994, Bebb wrote the 32-page pamphlet “Welsh Country Furniture,” which covered many distinct forms of Welsh woodwork.
There’s only one photo of a stick chair in there, but it’s a monster.
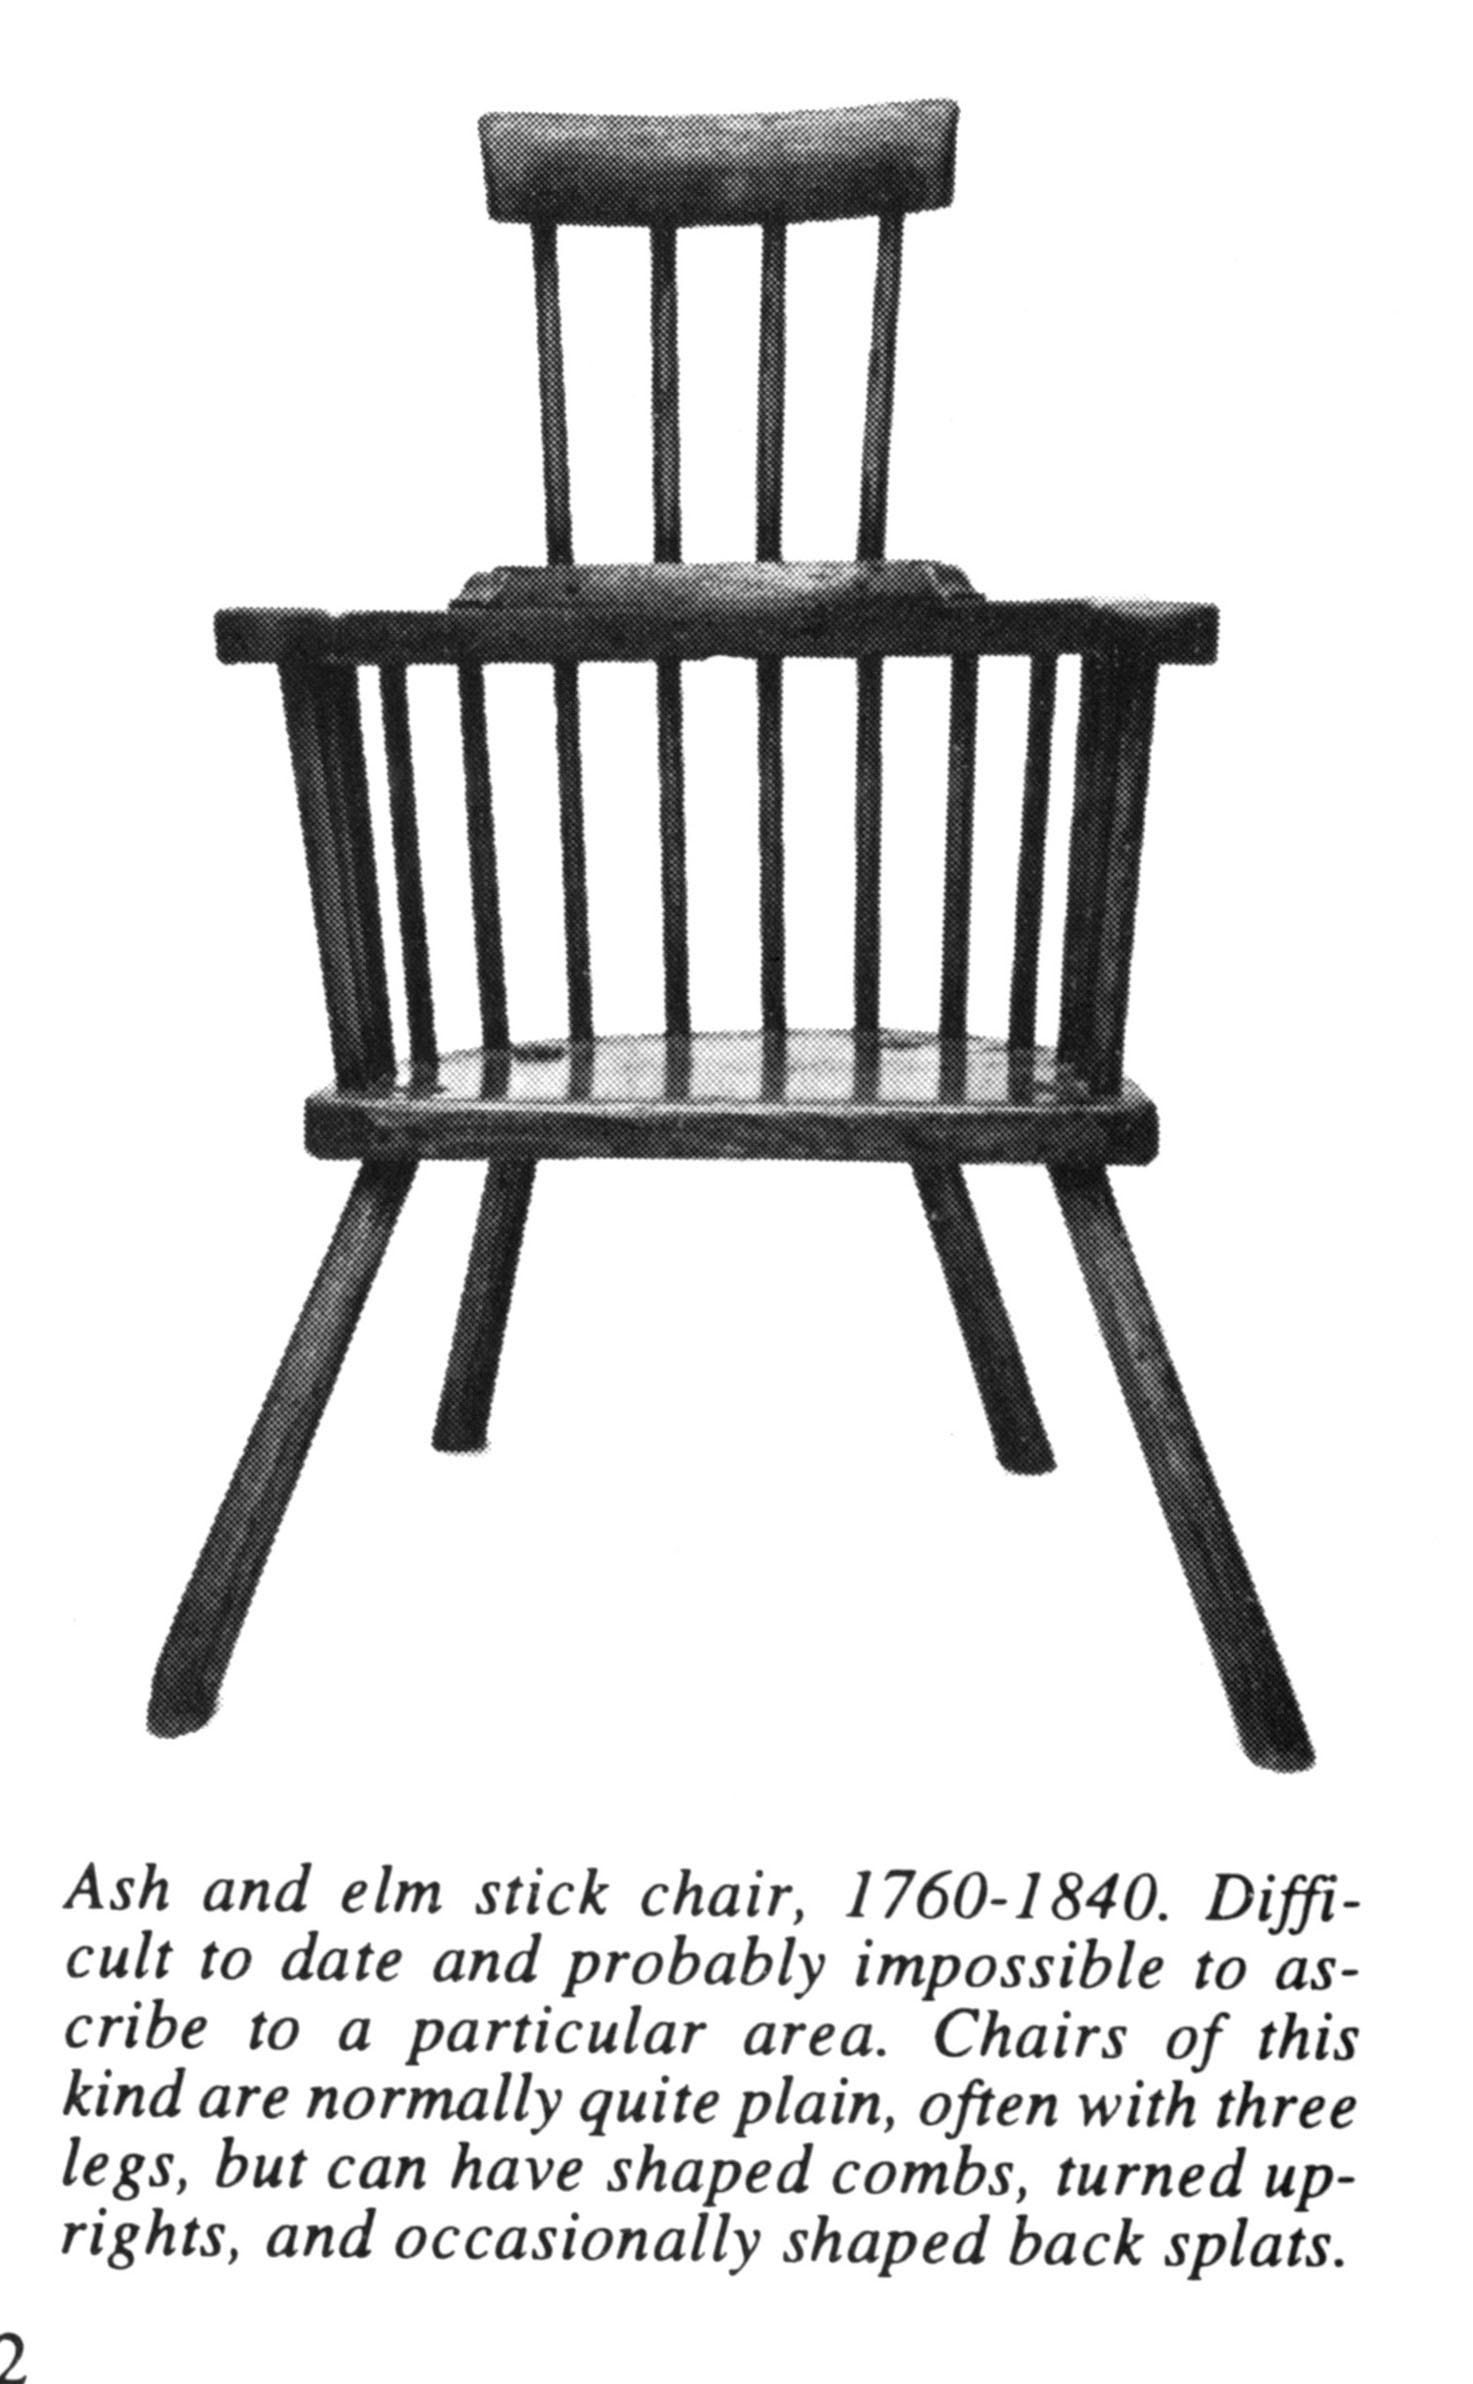
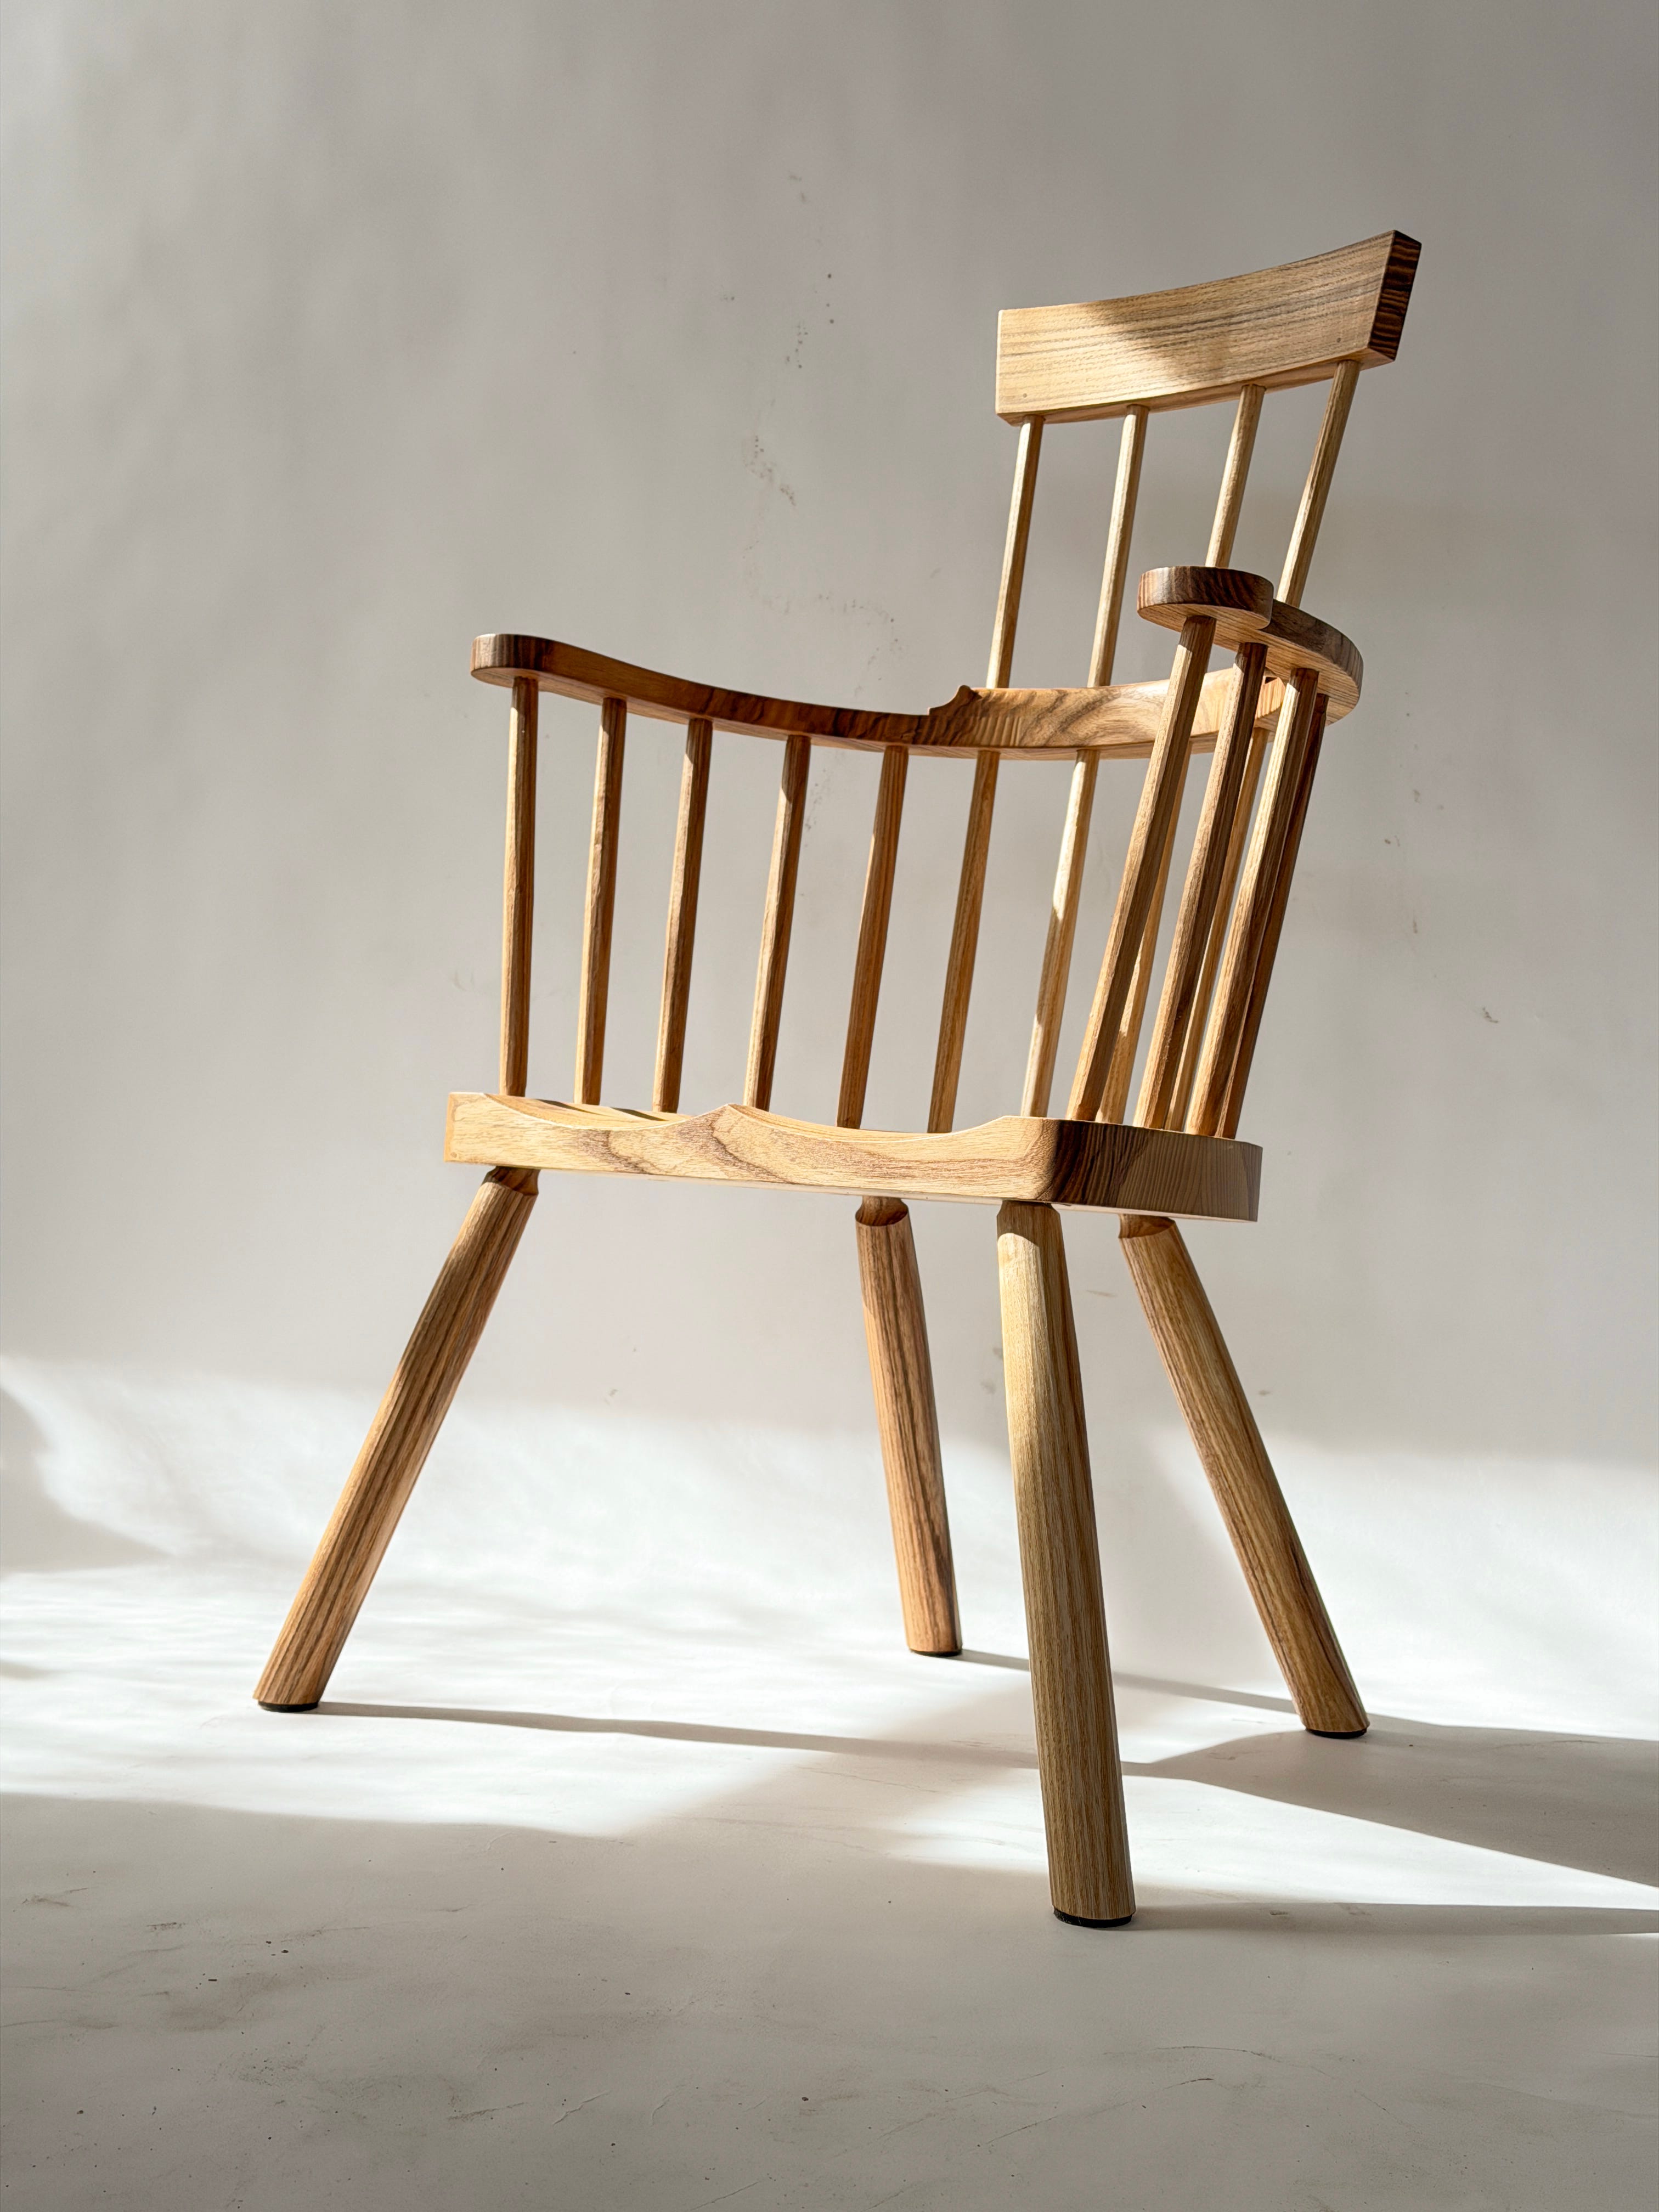
It’s a four-stick comb-back estimated to have been built between 1760 and 1840. It is Spartan in appearance, with small ogees on the end of its shoe as its only decorative detail. The chair’s form is striking, rakish yet balanced. The first time I saw it, I felt like I had known it all my life. It seemed an obvious and brilliant design.
That photo inspired me to design the four-stick comb-back in “The Anarchist’s Design Book, Expanded Edition.” That chair led to my squareback, seven-stick comb-back, lowback and many other forms.
But here’s the odd thing, I never built a version of the chair in the photo, until last year.
I call it the “Bebb Chair” because I first saw it in Bebb’s little book. I don’t go for romantic chair names. Usually, I name chairs after the town where I found it, or for the person who first showed me the form. I’m simple like that.


About the Bebb Chair
This chair has some distinct characteristics. The arm is 10-1/4" above the seat, which is a trait of some Welsh chairs. The seat is only 14" deep but is comfortable. And the comb is only 8" above the arm. Yet the whole chair is comfortable and appealing, even though the proportions are a bit different.
The strut legs are splayed out a lot. And the front legs are close to the edge of the seat, which seems reckless. Yet, the whole chair works well.
My interpretation of this chair is honest, but it is limited by the fact that I have never seen this chair from the side or rear. I know only the elevation view. But I speak “Welsh chair” fairly well, so I think I’m close.
Also, the seat on the original is unsaddled. I saddled my version, and I love the way it looks. The chair shown here is in quartersawn ash. I’ve also built a version in elm.
Cutting List & Notes
Here is a list of parts for this chair, followed by notes on how the pieces are shaped and joined.
4 Legs: 1-5/8" x 1-5/8" x 18" (overlong; trimmed after assembly)
• Legs are planed to cylinders. The top 7" of each leg is tapered to 1-1/8" to make it easier to cut the tenon.
• Tenons are 1"-diameter cylinders that are 2-1/2" long. The tenons are kerfed to accept a wedge at assembly.
1 Seat: 1-5/8" x 14" x 20"
• Grain runs left-to-right in the seat.
• Seat consists of a 4" x 20" rectangle joined to a 10"-radius half circle.
• Seat is saddled. Spindle deck is 1-3/4" wide. Saddle is 3/8" deep with a pommel.
• As built, the front of the seat is 15-5/8" from the floor (at pommel). The rear of the seat is 14-1/2" above the floor.
10 Short sticks: 11/16" diameter x 14-3/4"
• The short sticks are shaved with entasis to blend into 5/8"-diameter by 2-1/4"-long tenons on both ends.
• The tenons that go into the arms are wedged and trimmed after assembly.
• The tenons that go into the seat pass through the seat and are cut flush after assembly.
4 Long sticks: 11/16" diameter x 24"
• Back sticks are shaved and tapered to 5/8" at their tops.
• Tenons at the bottom of the long sticks are 5/8" x 2-1/4" and pass through the seat. They are trimmed after assembly.
• Long sticks are 5/8" in diameter where they pass through the arm.
1 Mid-arm: 1-3/4" x 4" x 13"
• Mid-arm is rabbeted at both ends to receive the arm pieces.
• The ends of the mid-arm are shaped into an ogee.
2 Arms: 7/8" x 4-1/2" x 16-1/2"
• Arms are glued into the rabbets in the mid-arm.
1 Comb 2" x 3" x 13-1/2"
• Ends of comb are cut at 8° off vertical.
• Outer two sticks are pegged for strength.
The Legs & Seat
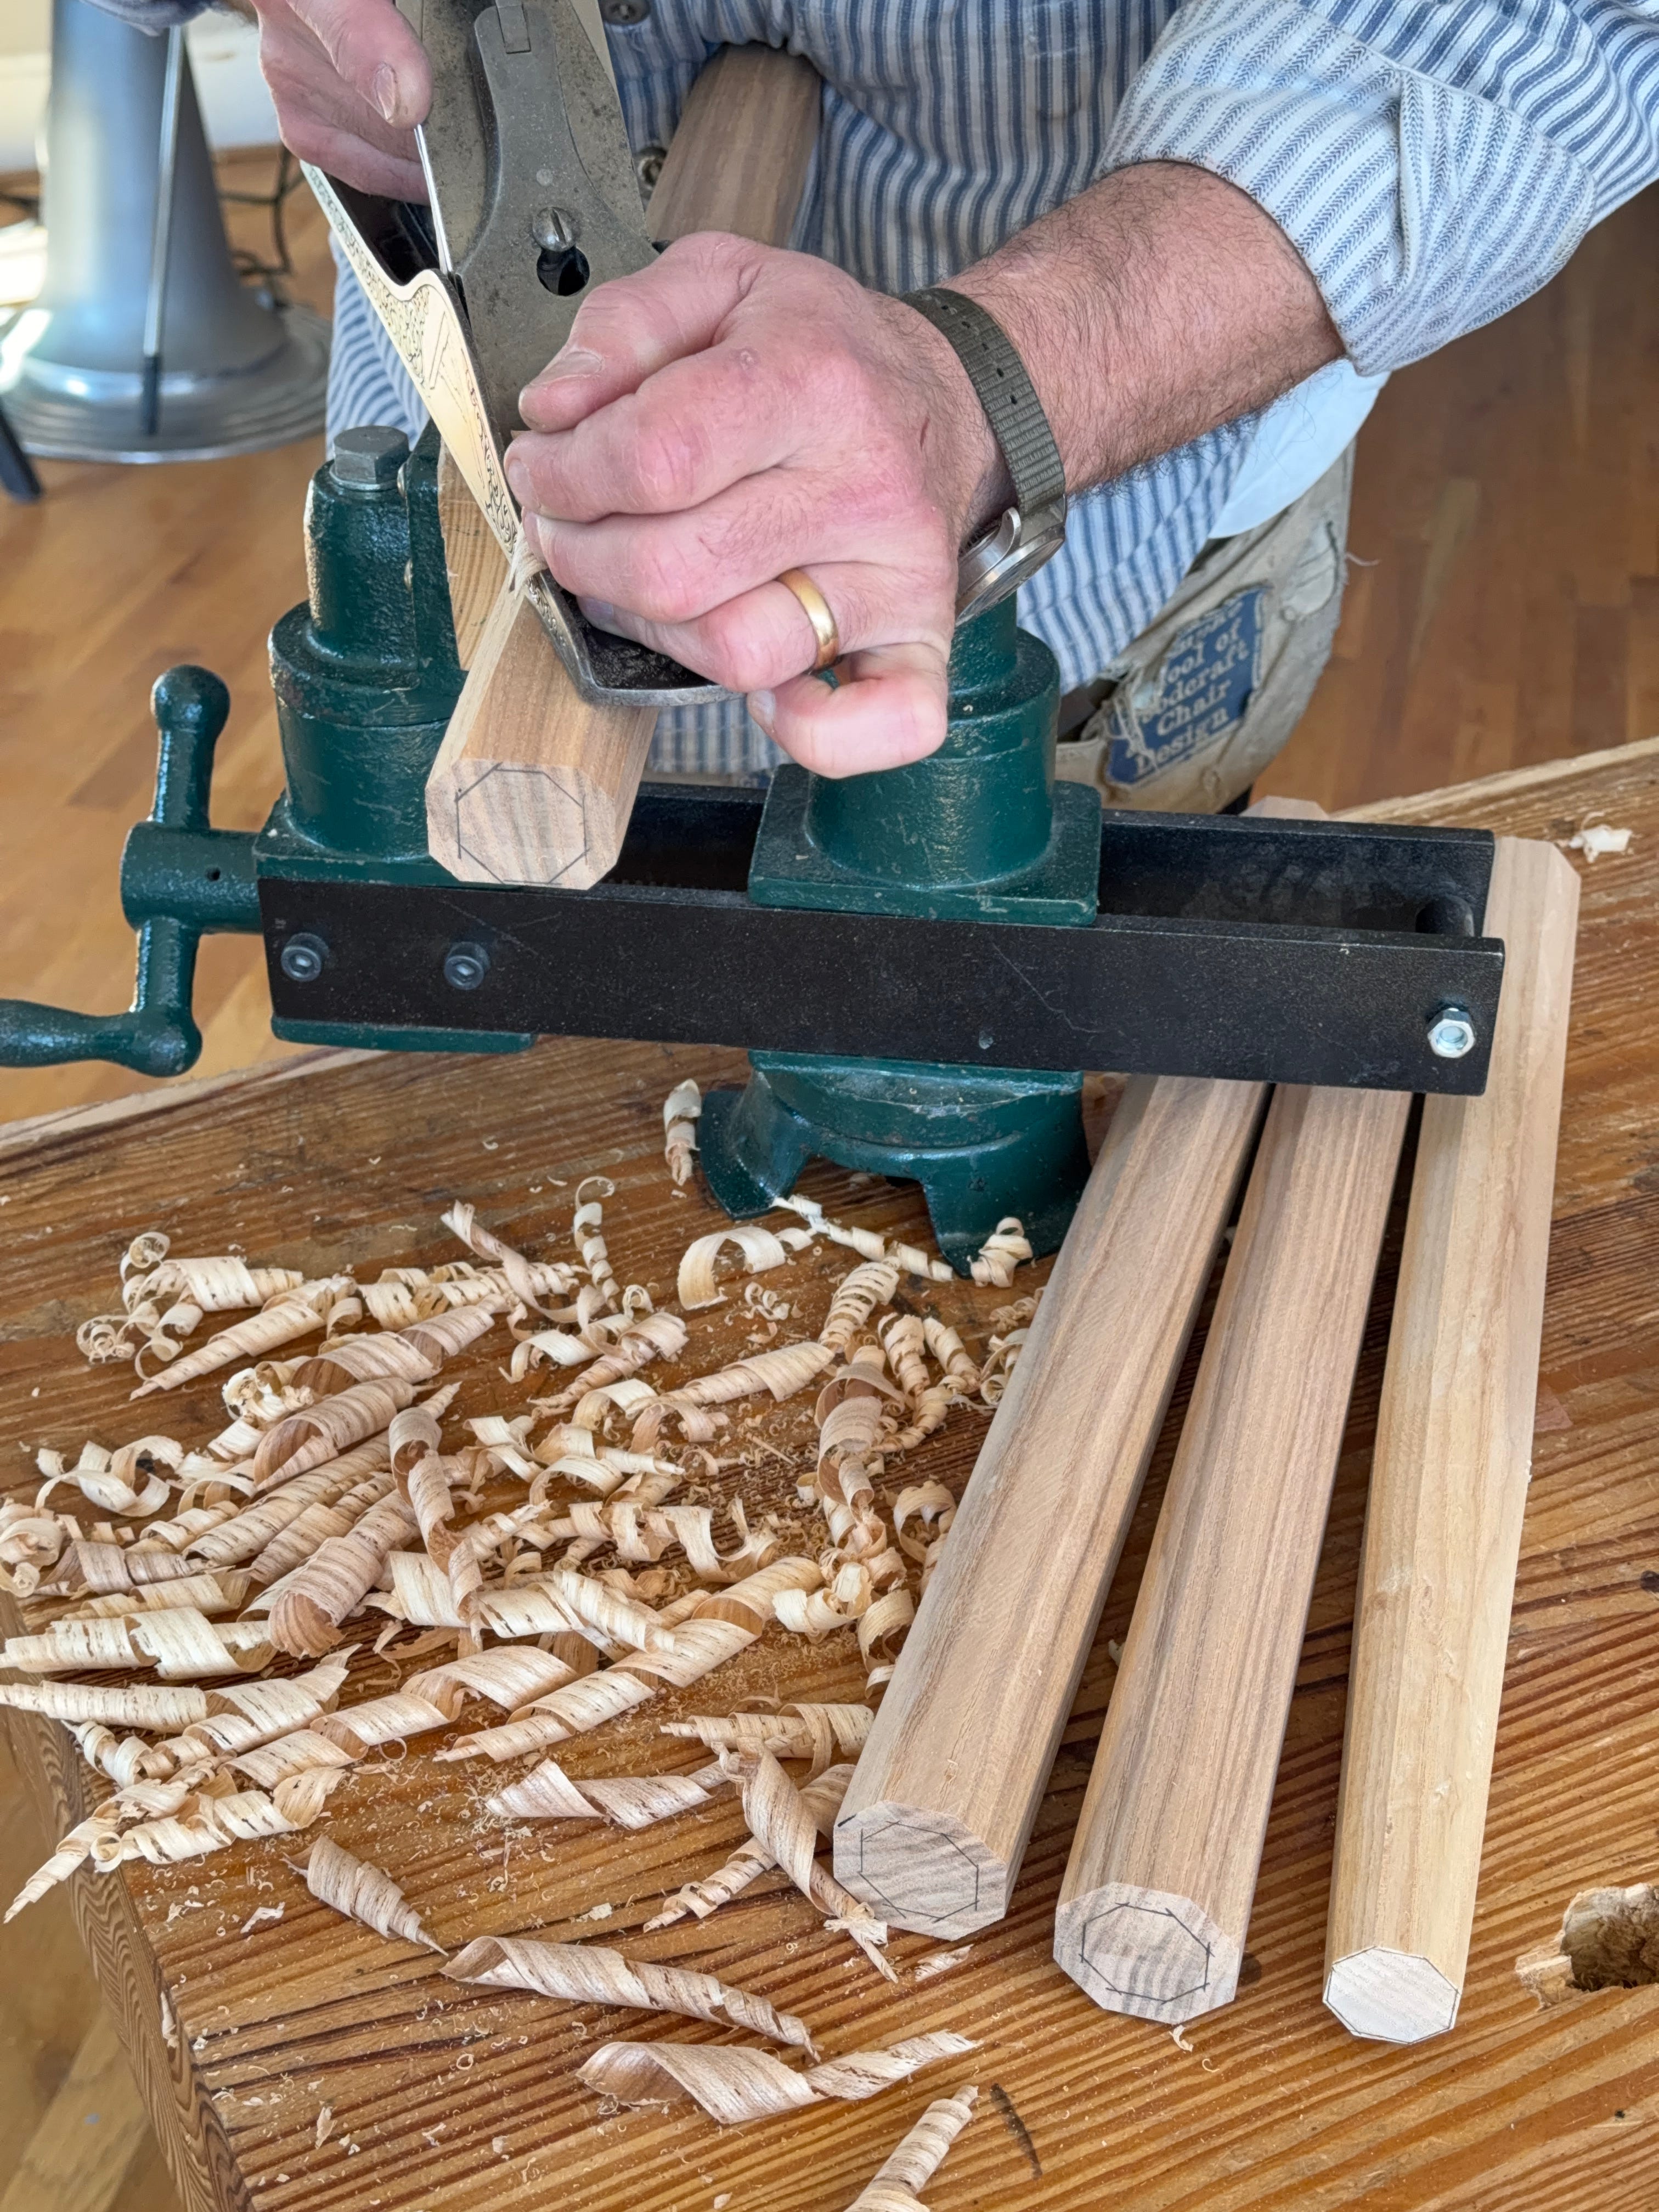
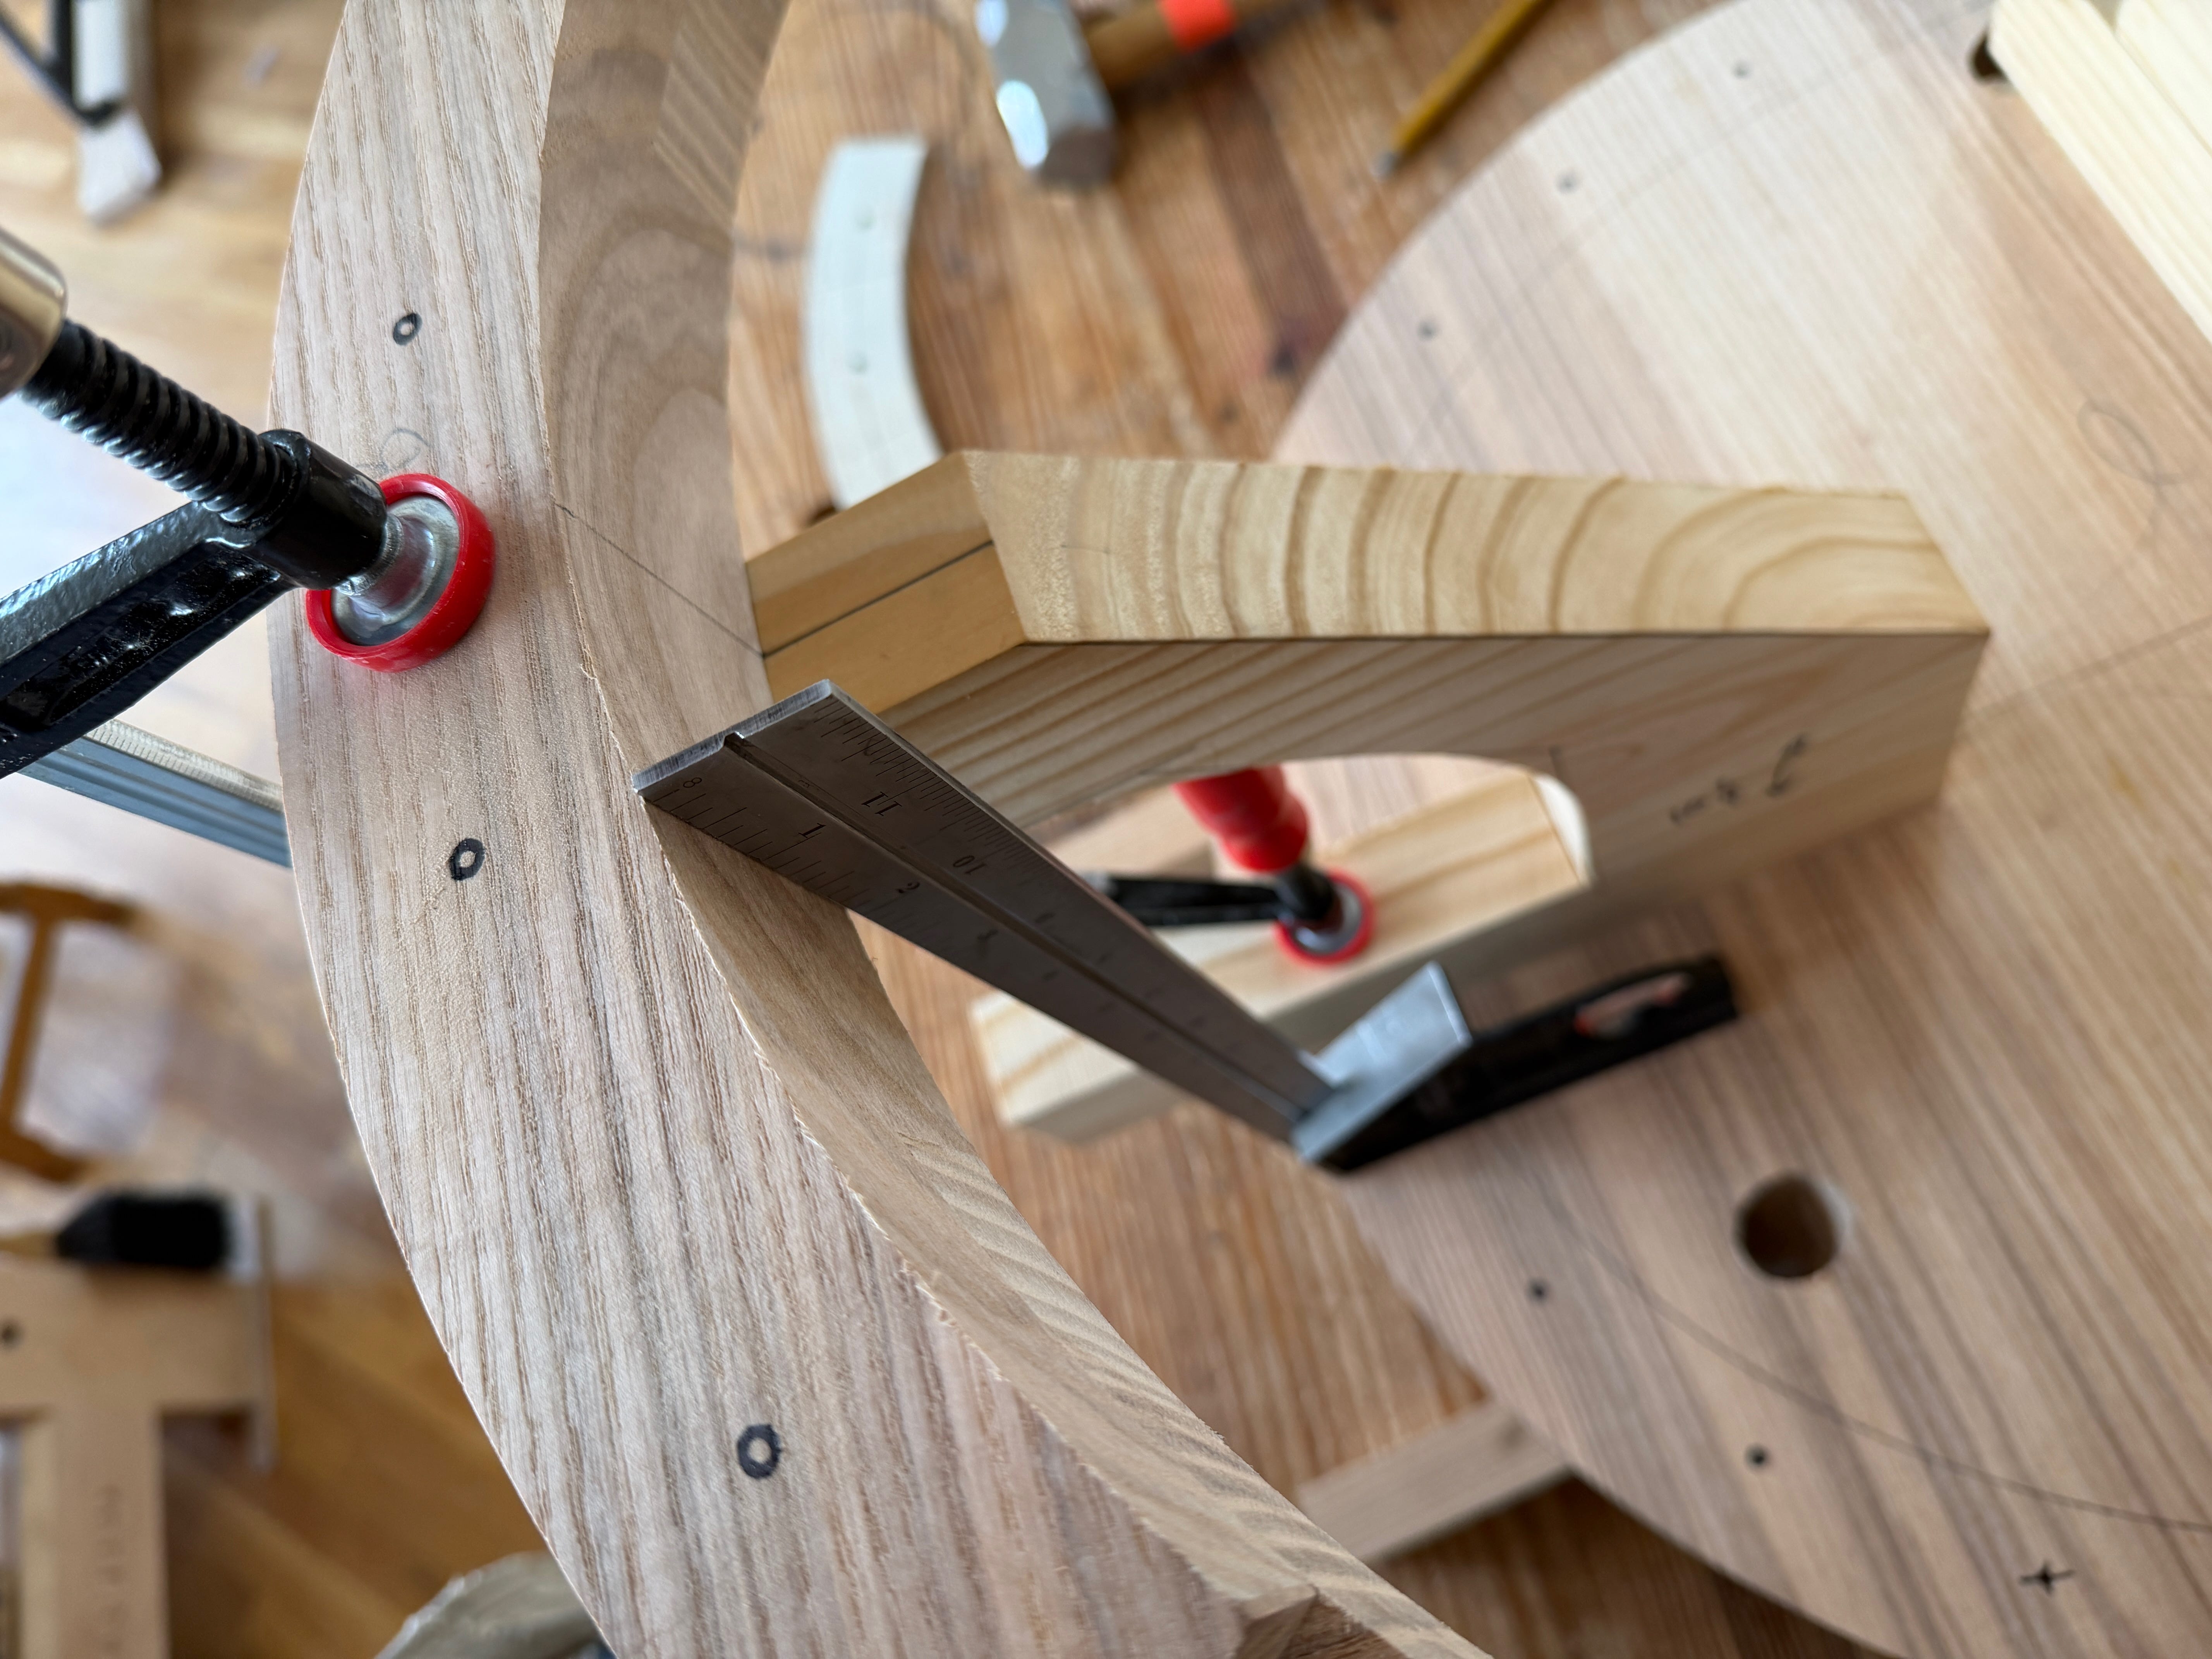
The legs are round cylinders and are mostly untapered. I started by making my legs octagonal. Then I tapered the top 7" (or so) to make it easier to cut the 1"-diameter cylindrical tenons. Here’s how.
Set a combination square to 1/4" and mark a smaller octagon on the end grain where the tenon will go. Then taper the top 7" of the leg down to those lines with a jack plane.
Cut the 1" x 2-1/2"-long tenons on the ends of your legs. Kerf the tenons. The kerfs should be parallel to the leg’s annular rings and go about 1-3/4" deep into the tenons. You can plane the legs cylindrical at any time; I do it right before assembling the chair.
Now make the seat. My seat is made from two boards that are edge-glued. The joint is reinforced with three loose tenons. Cut out the shape of the seat and lay out the location of the mortises and sightlines on the underside of the seat.
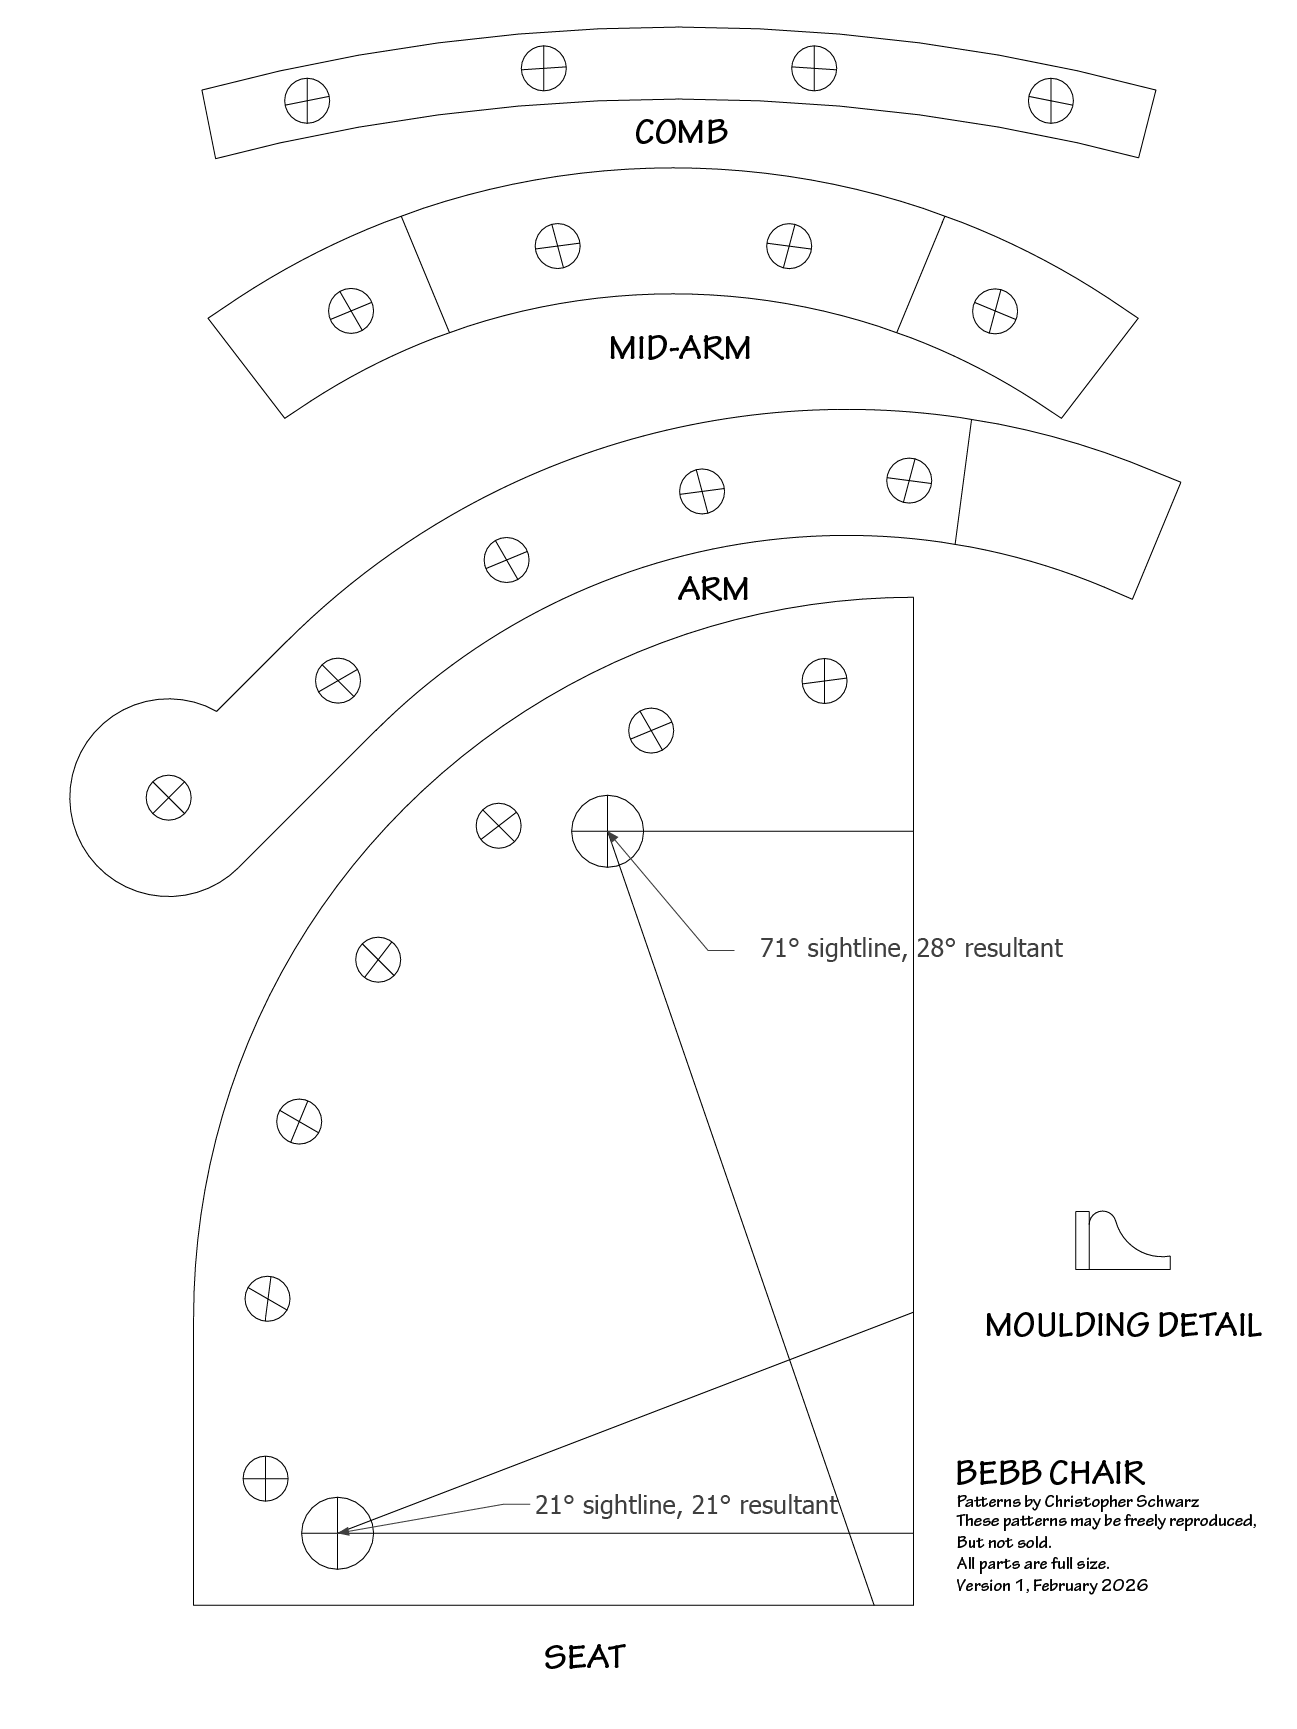
Drill the 1"-diameter through-mortises for the back legs first (it’s more difficult to see errors in the back legs, so they are a “warm up”). The sightlines for the rear legs are 71°. And the resultant drilling angle is 28°. Then drill the mortises for the front legs. The sightlines for the front legs are 21°. The resultant drilling angle is 21°.
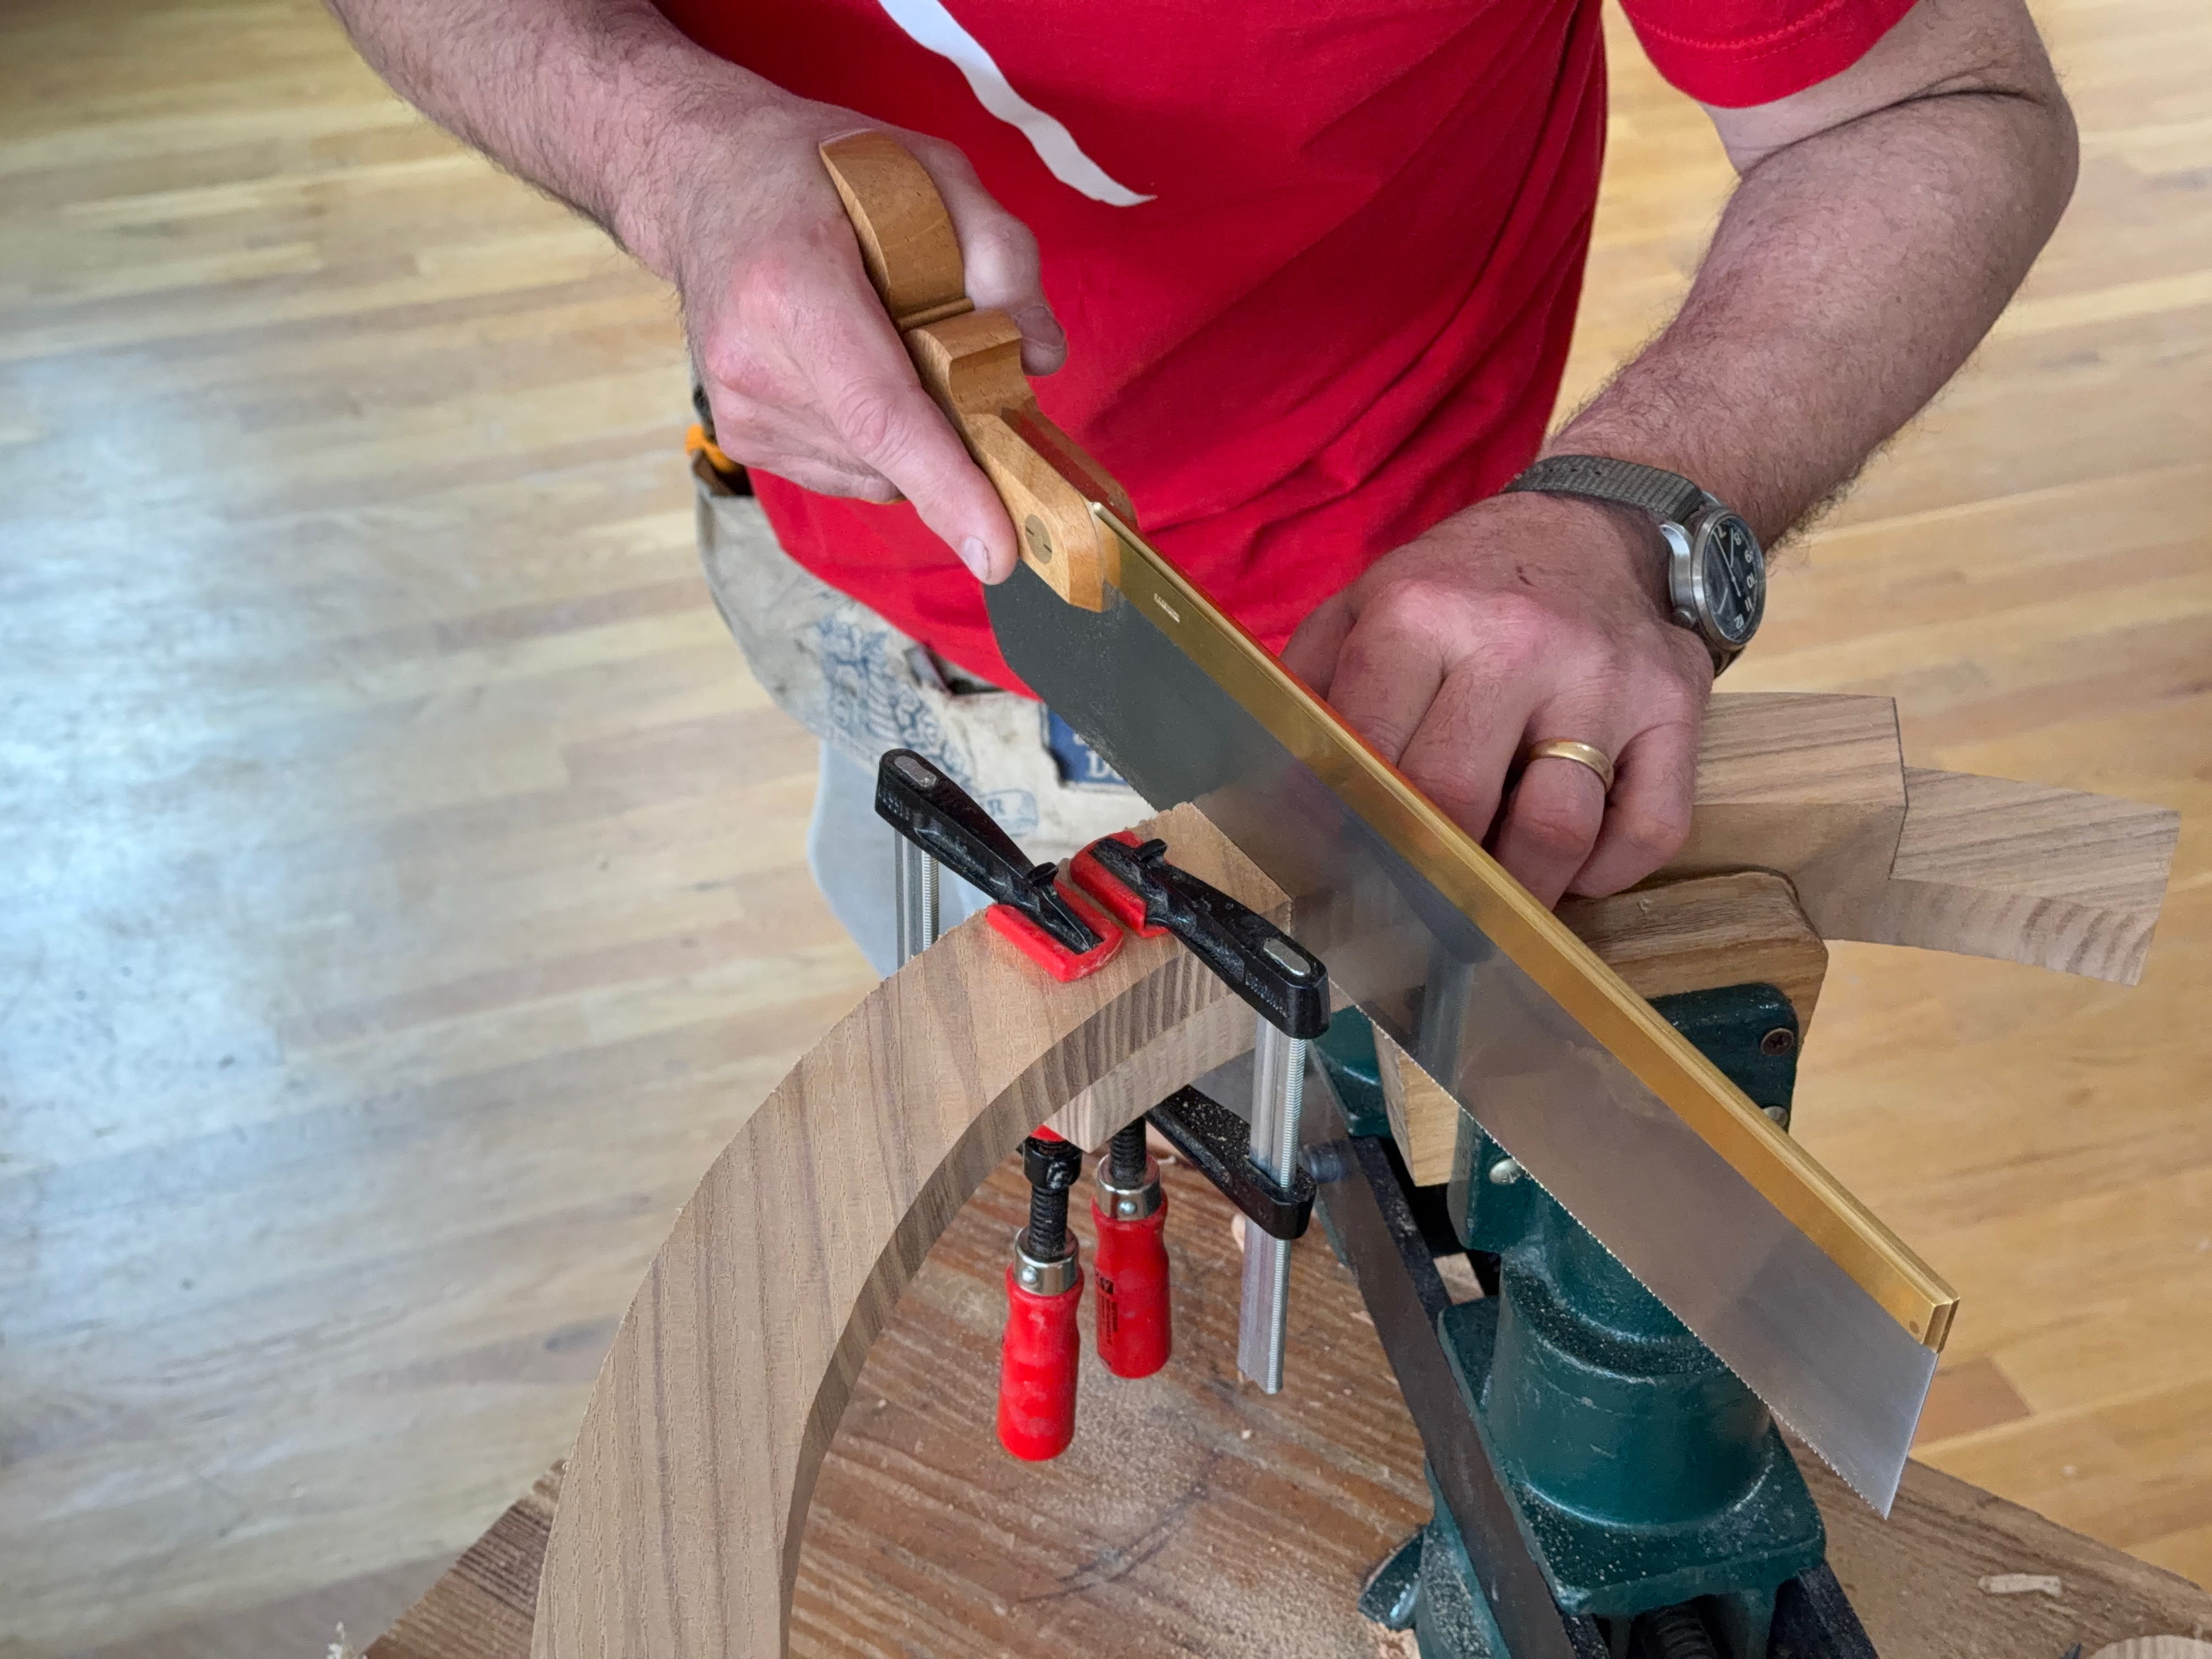
Resaw the Arms
I made this chair from one board of 8/4 ash. So I had to resaw the arms from 2"-thick material. First cut out the arm shape using the pattern. Then draw a centerline through the thickness of the piece. Saw the arm piece through the thickness to create two nearly identical arm pieces.


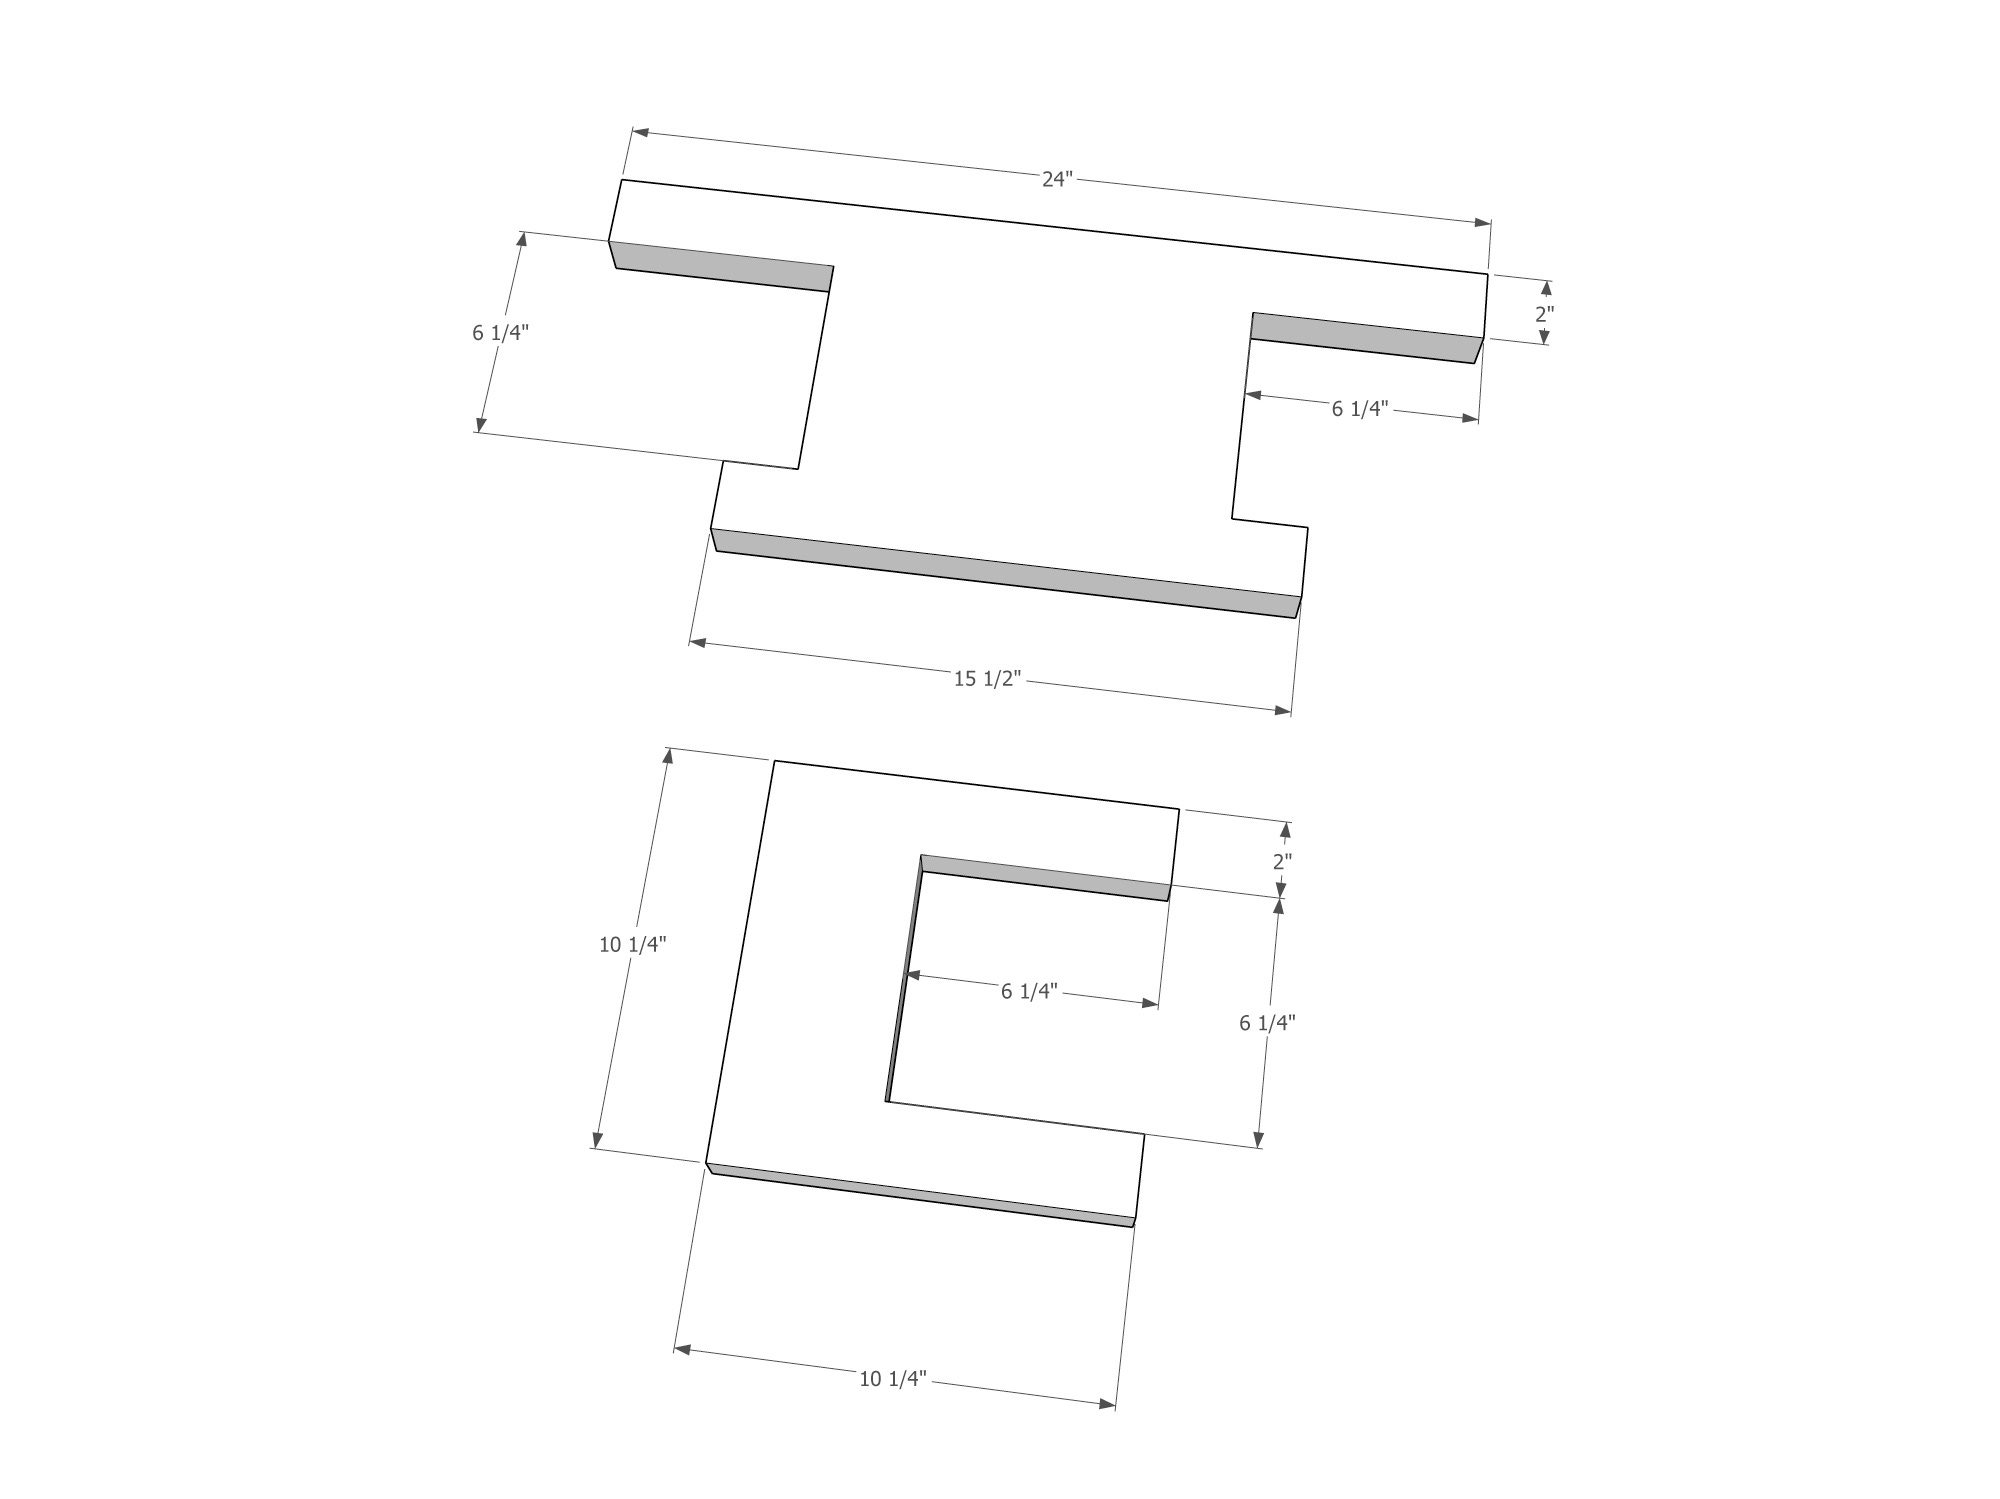
A 3-piece Arm
The mid-arm is a piece of 8/4 stock cut into a curved shape. The mid-arm is rabbeted to accept the arms. This is an authentic way to make a pieced armbow, and it is the way I first learned to make an arm in 2004.
Cut the mid-arm to shape and lay out the rabbets, using the patterns as a guide.


Saw the waste away. Then fit the arms into their rabbets. Usually the most difficult part of the joint is where the end grain of the two pieces kiss. You can plane the two surfaces until they meet. Or you can clamp the two pieces together and saw through the joint’s seam to get them to fit. Either way works.
After the joints fit seamlessly, paint glue on all the joint surfaces and clamp them together. Let the glue cure.
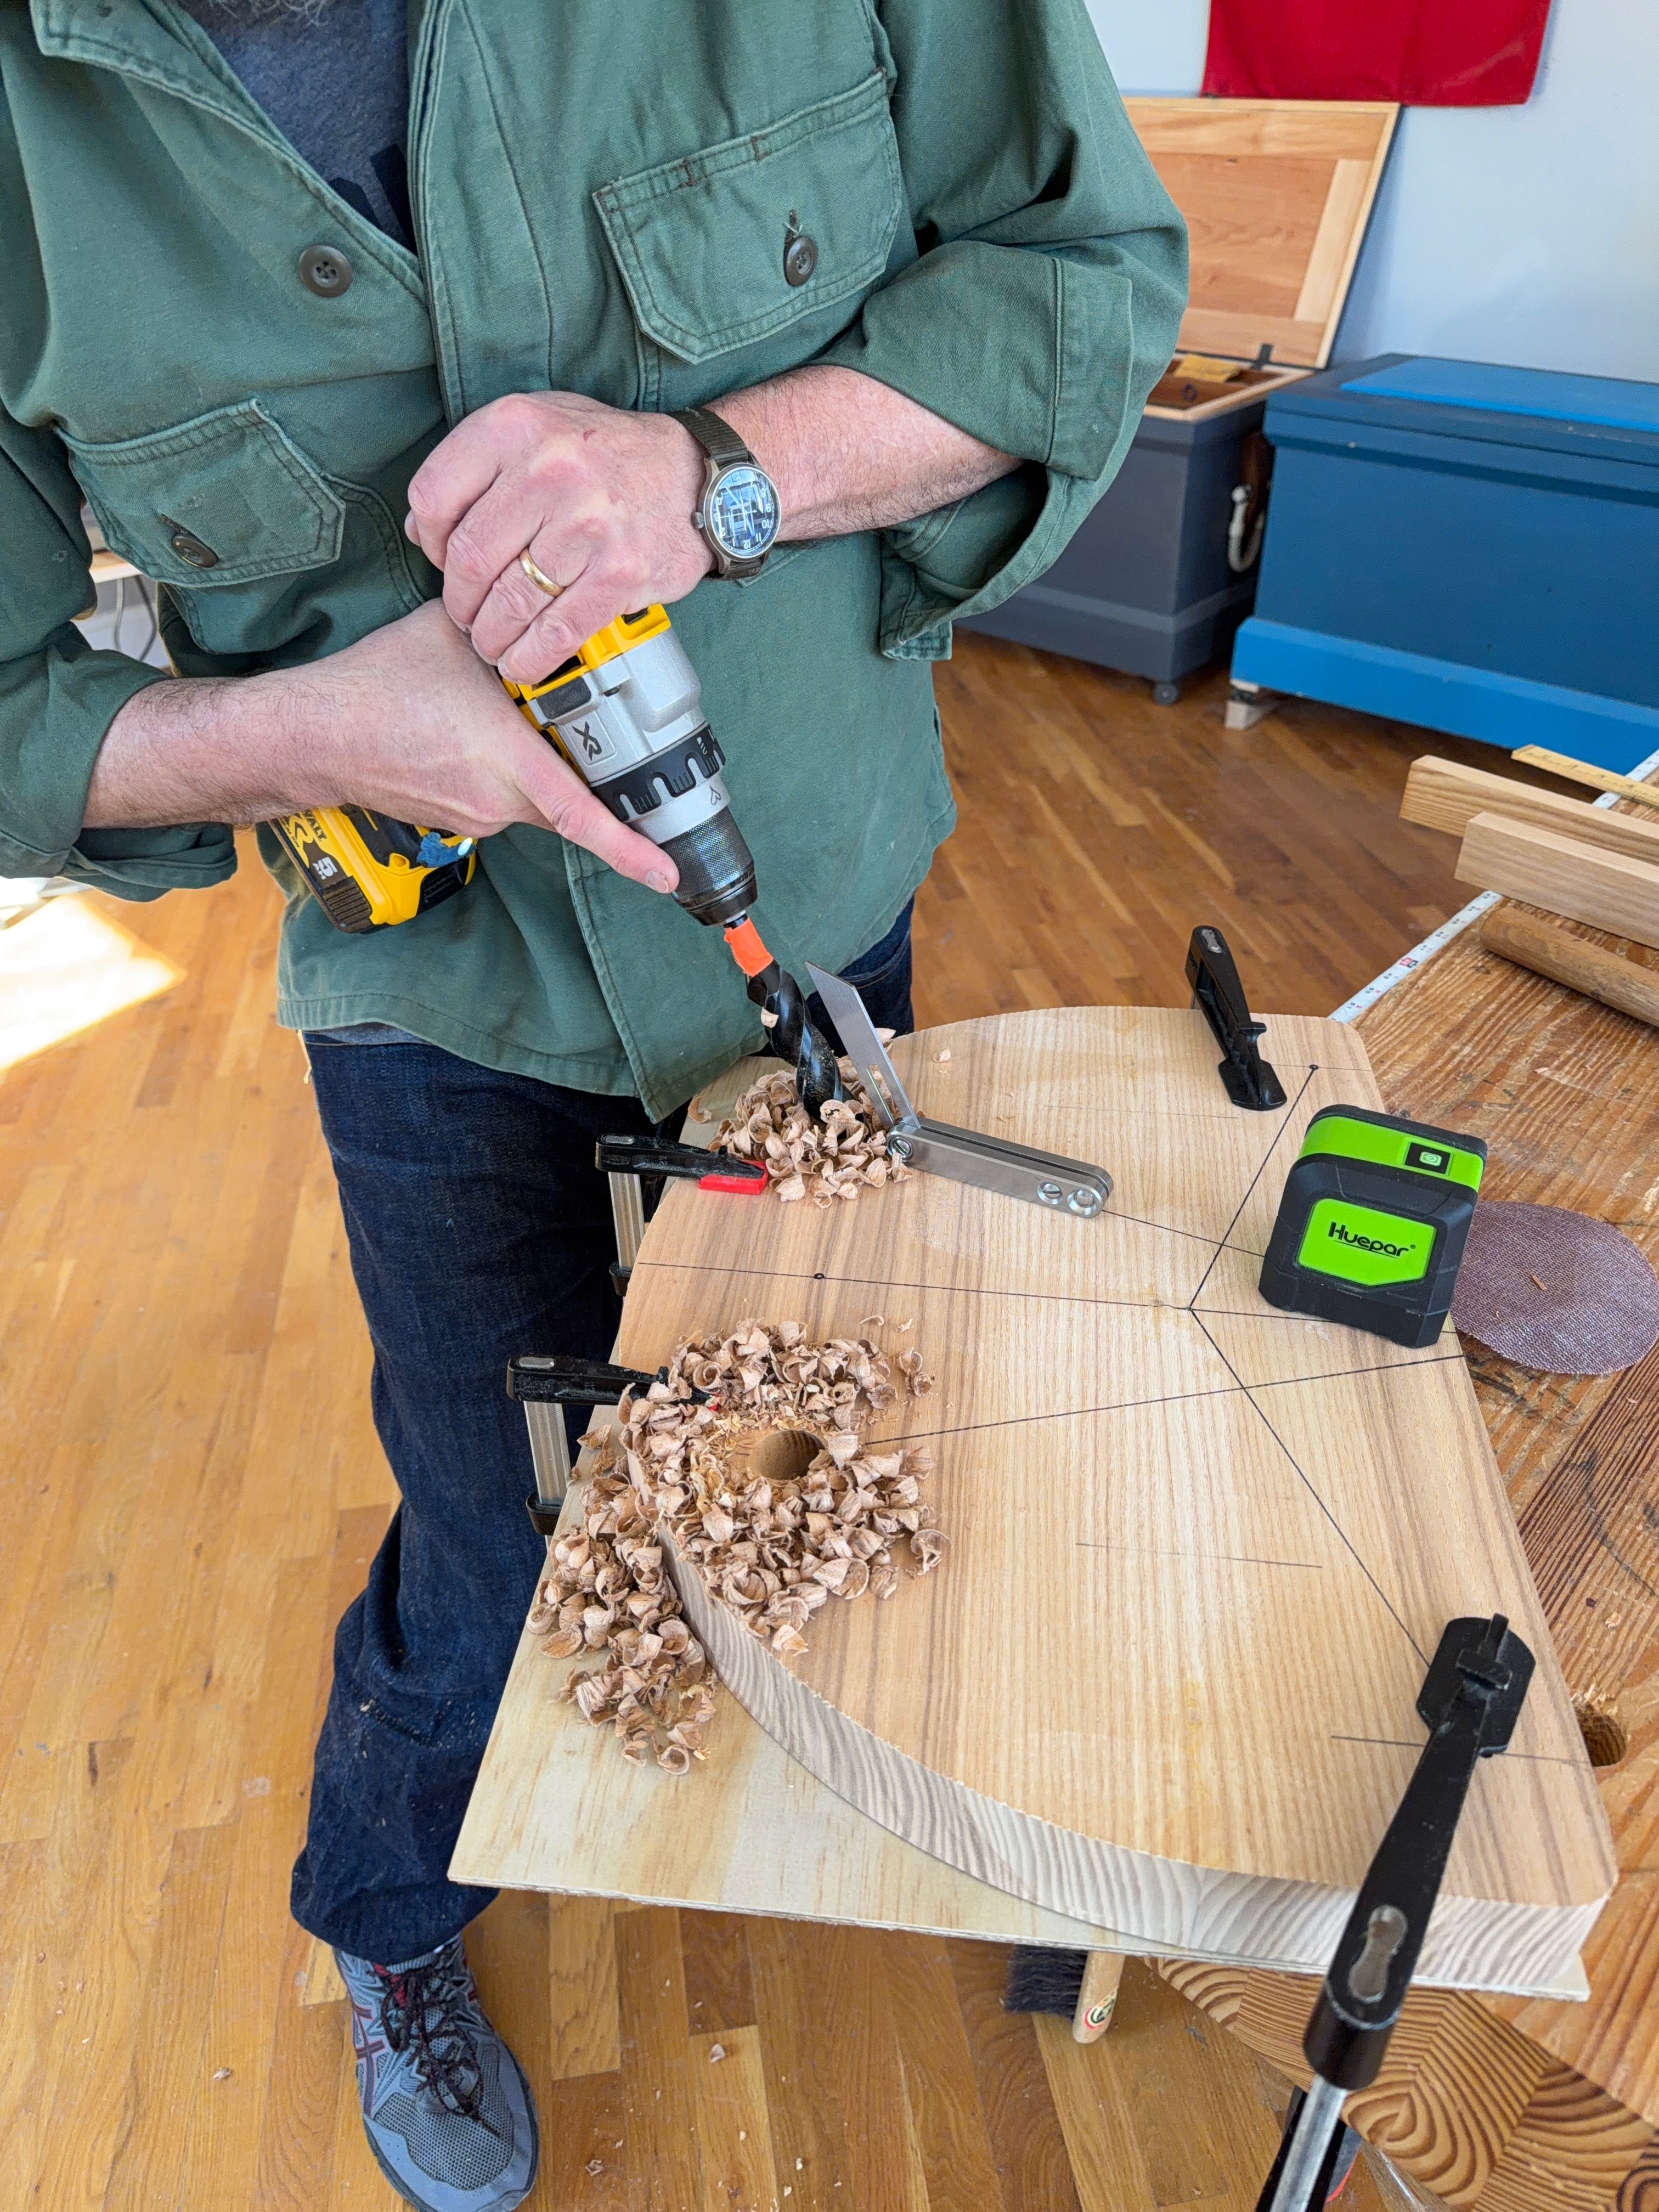
Drill Mortises for the Sticks
The only jigs you need to make for this chair are the two simple drilling jigs shown in the drawing below. The jigs hold the assembled armbow above the seat as you drill the 5/8"-diameter mortises through the arm and seat for the sticks.
Place the jigs on the centerline on the seat. Clamp them to the seat. Then place the armbow on top of the jigs. The armbow needs to be centered over the seat. And the inside edge of the arm needs to be in the same plane as the outside edge of the seat.
Drill the 5/8" mortises through the arm and seat. If you do it with an electric drill, keep the drill pressed flat against your body. Look at the photos. Imitate them (please). If you’re holding the drill like a pistol, you’re doing it wrong.
We use a construction laser on a tripod to help guide the drilling. You don’t have to have one to make the chair – I’ve made hundreds without it. But it is a nice spotter, and it doesn’t talk back at you.


Saddle the Seat & Glue in the Legs
The seat’s saddle is shallow, with more dramatic cups on the front edge. I saddle my seats using a scorp/inshave, followed by a travisher. Then I clean off the tool marks with scraping and a little sanding.
Shape the legs and remove any machine marks with a jack plane and a block plane.


Glue the legs into the seat with animal glue. Wedge the tenons, then let the glue dry. Trim the tenons flush to the seat’s saddle and remove any ugly tool marks. Plane the spindle deck flat and clean. Trim the legs to set the final seat height and tilt.
Make the Sticks
Cut all the tenons on your short sticks and long sticks. I used a Stanley No. 77 Doweling Machine. Shave the short sticks to octagons and then to final shape, tapering the facets down to the tenons. This slight swelling in the middle of the stick – called entasis – gives the chair some life.
For the long sticks, I first make them octagons with a jack plane. Then, also with a jack plane, I taper them from top to bottom so the top of the long stick is a little bigger than 5/8".
Then shave the long sticks with a block plane until their top parts fit through the arm. Finally, shave the bottom part of the long stick down to the tenon.


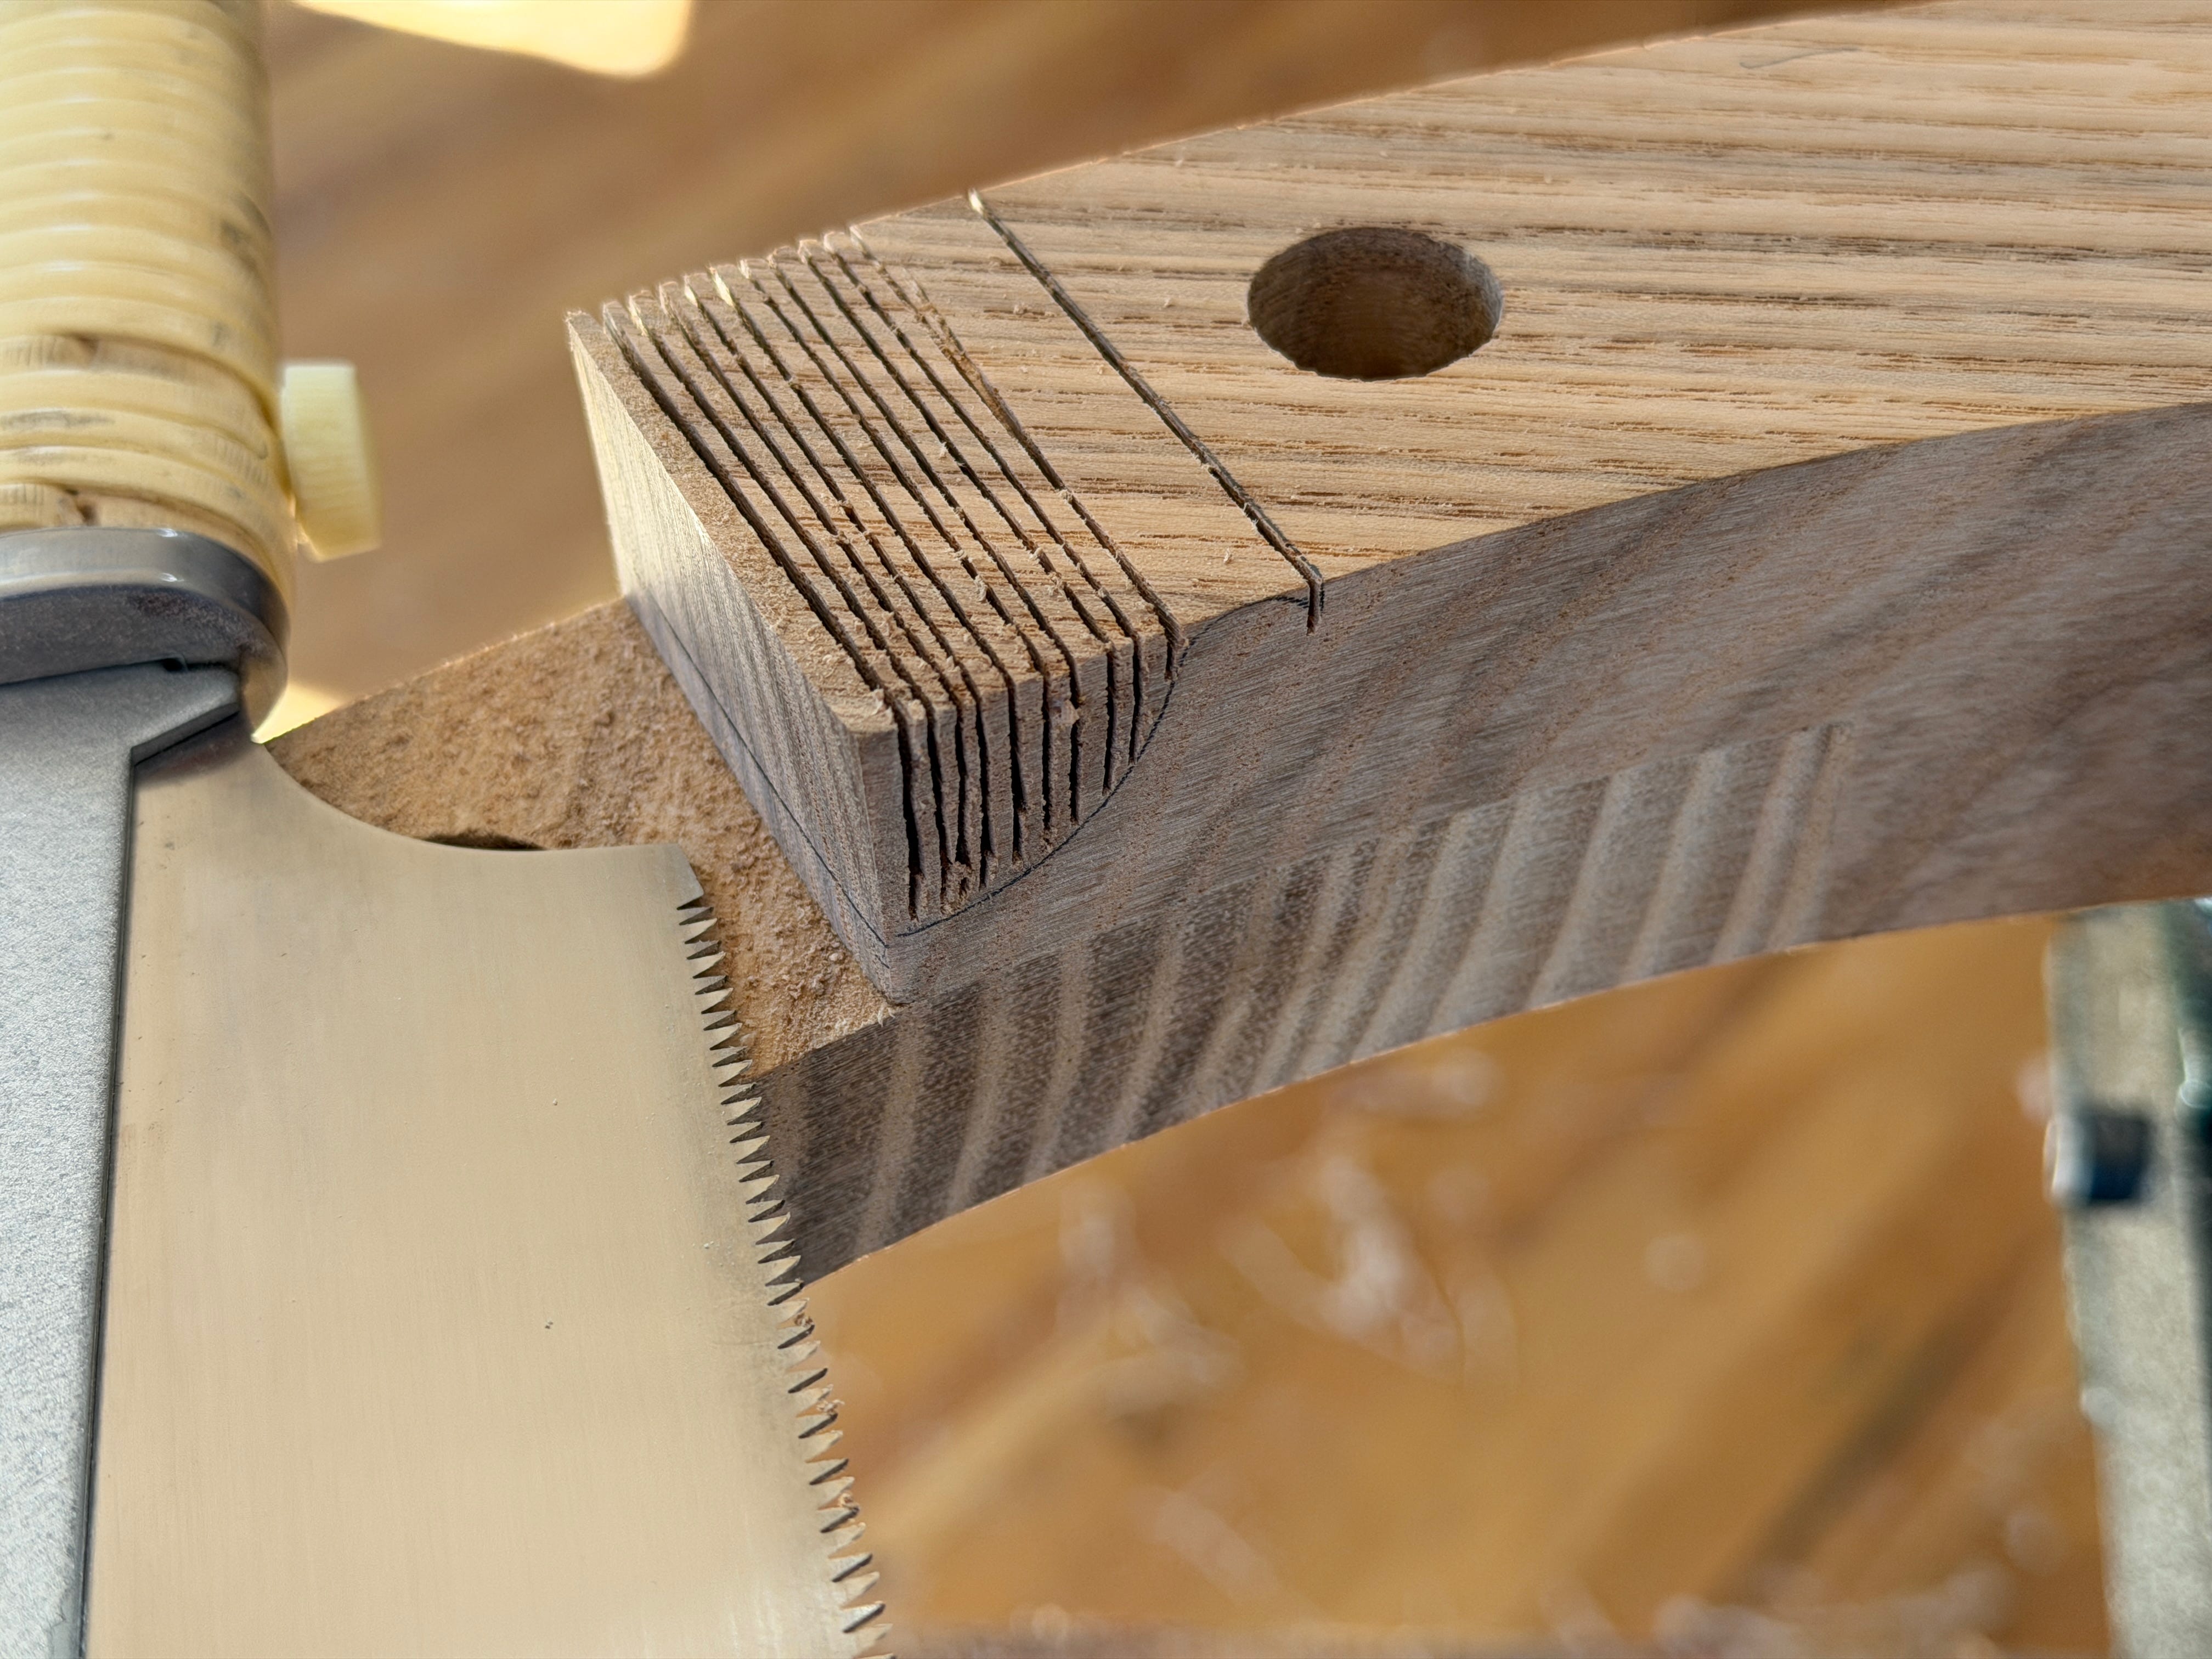
Add the Ogees
Each end of the shoe of the armbow is decorated with a simple ogee. Lay out the shape on both the front and back of the shoe. Connect the layouts on the ends of the shoe. Begin removing the waste by sawing a bunch of kerfs across the shoe and down to your layout lines.
Remove that waste with a coping saw, a narrow chisel or both. Pare the ogee with the narrow chisel (I used a 1/4") to get the moulding as close to finished as possible. Then finish up the work with a rasp and sandpaper (if necessary).


Keep reading with a 7-day free trial
Subscribe to The American Peasant to keep reading this post and get 7 days of free access to the full post archives.